📖5. Navigation
The Tour of Heroes application has new requirements:
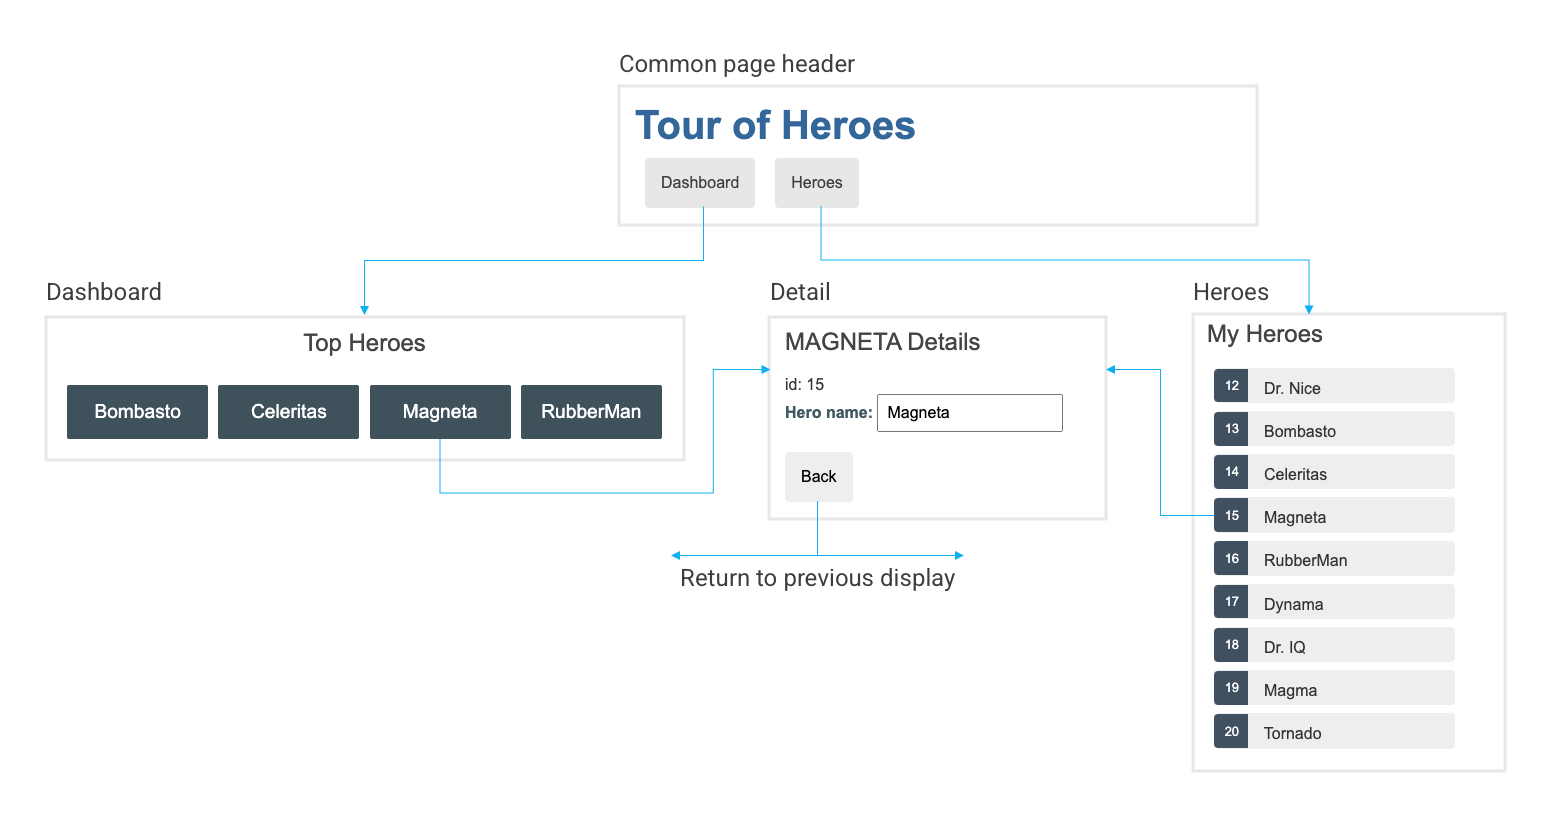
Add a Dashboard view
Add the ability to navigate between the Heroes and Dashboard views
When users click a hero name in either view, navigate to a detail view of the selected hero
When users click a deep link in an email, open the detail view for a particular hero
For the sample application that this page describes, see the live example / download example.
When you're done, users can navigate the application like this:
Routes
In Angular the routes of an application are configured in the app.routes.ts file.
Routes tell the Router which view to display when a user clicks a link or pastes a URL into the browser address bar.
Since app.routes.ts already imports HeroesComponent, you can use it in the routes array:
A typical Angular Route has two properties:
path
A string that matches the URL in the browser address bar.
component or loadComponent
The component that the router should create when navigating to this route.
This tells the router to match that URL to path: 'heroes' and display the HeroesComponent when the URL is something like localhost:4200/heroes.
Register the routes
In the file app.config.ts these routes are imported with provideRouter(routes).
Add RouterOutlet
RouterOutletOpen the AppComponent template and replace the <app-heroes> element with a <router-outlet> element.
The AppComponent template no longer needs <app-heroes> because the application only displays the HeroesComponent when the user navigates to it.
The <router-outlet> tells the router where to display routed views.
The RouterOutlet is one of the router directives that became available to the AppComponent because the Angular router is imported with provideRouter in the app.config.ts file.
Try it
If you're not still serving your application, run ng serve to see your application in the browser.
The browser should refresh and display the application title but not the list of heroes.
Look at the browser's address bar. The URL ends in /. The route path to HeroesComponent is /heroes.
Append /heroes to the URL in the browser address bar. You should see the familiar heroes overview/detail view.
Remove /heroes from the URL in the browser address bar. The browser should refresh and display the application title but not the list of heroes.
Add a navigation link using routerLink
routerLinkIdeally, users should be able to click a link to navigate rather than pasting a route URL into the address bar.
Add a <nav> element and, within that, an anchor element that, when clicked, triggers navigation to the HeroesComponent. The revised AppComponent template looks like this:
A routerLink attribute is set to "/heroes", the string that the router matches to the route to HeroesComponent. The routerLink is the selector for the RouterLink directive that turns user clicks into router navigations. It's another of the public directives in the RouterModule.
The browser refreshes and displays the application title and heroes link, but not the heroes list.
Click the link. The address bar updates to /heroes and the list of heroes appears.
Make this and future navigation links look better by adding private CSS styles to app.component.css as listed in the final code review below.
Add a dashboard view
Routing makes more sense when your application has more than one view, yet the Tour of Heroes application has only the heroes view.
To add a DashboardComponent, run ng generate as shown here:
ng generate creates the files for the DashboardComponent.
Replace the default content in these files as shown here:
The template presents a grid of hero name links.
The
@forrepeater creates as many links as are in the component'sheroesarray.The links are styled as colored blocks by the
dashboard.component.css.The links don't go anywhere yet.
The class is like the HeroesComponent class.
It defines a
heroesarray propertyThe constructor expects Angular to inject the
HeroServiceinto a privateheroServicepropertyThe
ngOnInit()lifecycle hook callsgetHeroes()
This getHeroes() returns the sliced list of heroes at positions 1 and 5, returning only Heroes two, three, four, and five.
Add the dashboard route
To navigate to the dashboard, the router needs an appropriate route.
Add a route to the routes array that matches a path to the DashboardComponent.
Add a default route
When the application starts, the browser's address bar points to the web site's root. That doesn't match any existing route so the router doesn't navigate anywhere. The space below the <router-outlet> is blank.
To make the application navigate to the dashboard automatically, add the following route to the routes array.
This route redirects a URL that fully matches the empty path to the route whose path is '/dashboard'.
After the browser refreshes, the router loads the DashboardComponent and the browser address bar shows the /dashboard URL.
Add dashboard link to the shell
The user should be able to navigate between the DashboardComponent and the HeroesComponent by clicking links in the navigation area near the top of the page.
Add a dashboard navigation link to the AppComponent shell template, just above the Heroes link.
After the browser refreshes you can navigate freely between the two views by clicking the links.
Navigating to hero details
The HeroDetailComponent displays details of a selected hero. At the moment the HeroDetailComponent is only visible at the bottom of the HeroesComponent
The user should be able to get to these details in three ways.
By clicking a hero in the dashboard.
By clicking a hero in the heroes list.
By pasting a "deep link" URL into the browser address bar that identifies the hero to display.
This section enables navigation to the HeroDetailComponent and liberates it from the HeroesComponent.
Delete hero details from HeroesComponent
HeroesComponentWhen the user clicks a hero in HeroesComponent, the application should navigate to the HeroDetailComponent, replacing the heroes list view with the hero detail view. The heroes list view should no longer show hero details as it does now.
Open the heroes/heroes.component.html and delete the <app-hero-detail> element from the bottom.
Clicking a hero item now does nothing. You can fix that after you enable routing to the HeroDetailComponent.
Add a hero detail route
A URL like ~/detail/11 would be a good URL for navigating to the Hero Detail view of the hero whose id is 11.
Add a parameterized route to the routes array that matches the path pattern to the hero detail view.
The colon : character in the path indicates that :id is a placeholder for a specific hero id.
At this point, all application routes are in place.
DashboardComponent hero links
DashboardComponent hero linksThe DashboardComponent hero links do nothing at the moment.
Now that the router has a route to HeroDetailComponent, fix the dashboard hero links to navigate using the parameterized dashboard route.
You're using Angular interpolation binding within the @for repeater to insert the current iteration's hero.id into each routerLink.
HeroesComponent hero links
HeroesComponent hero linksThe hero items in the HeroesComponent are <li> elements whose click events are bound to the component's onSelect() method.
Remove the inner HTML of <li>. Wrap the badge and name in an anchor <a> element. Add a routerLink attribute to the anchor that's the same as in the dashboard template.
Be sure to fix the private style sheet in heroes.component.css to make the list look as it did before. Revised styles are in the final code review at the bottom of this guide.
Remove dead code - optional
While the HeroesComponent class still works, the onSelect() method and selectedHero property are no longer used.
It's nice to tidy things up for your future self. Here's the class after pruning away the dead code.
Routable HeroDetailComponent
HeroDetailComponentThe parent HeroesComponent used to set the HeroDetailComponent.hero property and the HeroDetailComponent displayed the hero.
HeroesComponent doesn't do that anymore. Now the router creates the HeroDetailComponent in response to a URL such as ~/detail/12.
The HeroDetailComponent needs a new way to get the hero to display. This section explains the following:
Get the route that created it
Extract the
idfrom the routeGet the hero with that
idfrom the server using theHeroService
Add the following imports:
If you are using WebStorm as your IDE, it will usually help you and automatically create the imports, as soon as you use those elements. Ask your instructor for a demo.
Inject the ActivatedRoute, HeroService, and Location services, saving their values in private fields:
The ActivatedRoute holds information about the route to this instance of the HeroDetailComponent. This component is interested in the route's parameters extracted from the URL. The "id" parameter is the id of the hero to display.
The HeroService gets hero data from the remote server and this component uses it to get the hero-to-display.
The location is an Angular service for interacting with the browser. This service lets you navigate back to the previous view.
Extract the id route parameter
id route parameterIn the ngOnInit() lifecycle hook call getHero() and define it as follows.
The route.snapshot is a static image of the route information shortly after the component was created.
The paramMap is a dictionary of route parameter values extracted from the URL. The "id" key returns the id of the hero to fetch.
Route parameters are always strings. The JavaScript Number function converts the string to a number, which is what a hero id should be.
The browser refreshes and the application crashes with a compiler error. HeroService doesn't have a getHero() method. Add it now.
Add HeroService.getHero()
HeroService.getHero()Open HeroService and add the following getHero() method with the id after the getHeroes() method:
IMPORTANT:
The backtick ( ` ) characters define a JavaScript template literal for embedding the id.
Like getHeroes(), getHero() has an asynchronous signature. It returns a mock hero as an Observable, using the RxJS of() function.
You can rewrite getHero() as a real Http request without having to change the HeroDetailComponent that calls it.
Try it
The browser refreshes and the application is working again. You can click a hero in the dashboard or in the heroes list and navigate to that hero's detail view.
If you paste localhost:4200/detail/12 in the browser address bar, the router navigates to the detail view for the hero with id: 12, Dr Nice.
Find the way back
By clicking the browser's back button, you can go back to the previous page. This could be the hero list or dashboard view, depending upon which sent you to the detail view.
It would be nice to have a button on the HeroDetail view that can do that.
Add a go back button to the bottom of the component template and bind it to the component's goBack() method.
Add a goBack() method to the component class that navigates backward one step in the browser's history stack using the Location service that you used to inject.
Refresh the browser and start clicking. Users can now navigate around the application using the new buttons.
The details look better when you add the private CSS styles to hero-detail.component.css as listed in one of the "final code review" tabs below.
Final code review
Here are the code files discussed on this page.
Routing and HeroService
AppComponent
AppComponentDashboardComponent
DashboardComponentHeroesComponent
HeroDetailComponent
Summary
You added the Angular router to navigate among different components
You turned the
AppComponentinto a navigation shell with<a>links and a<router-outlet>You configured the router in an
app.routes.tsYou defined routes, a redirect route, and a parameterized route
You used the
routerLinkdirective in anchor elementsYou refactored a tightly coupled main/detail view into a routed detail view
You used router link parameters to navigate to the detail view of a user-selected hero
You shared the
HeroServicewith other components
→ Hier geht es weiter
💡Hinweise und Zusatzaufgaben zu Kapitel 5Last updated